OpenBSD Router GuideNetwork segmenting firewall, DHCP, DNS with Unbound, domain blocking and much more
|
Introduction
We will use a setup in which the router segments the local area network (LAN) into three separate networks, one for the grown-ups in the house, one for the children, and one for public facing servers (a DMZ), such as a private web server or mail server. We will also look at how we can use DNS to block out ads, porn, and other websites on the Internet. The OpenBSD router can also be used on small to mid-size offices.
Table of contents
- Typographical conventions used in this guide
- Why a firewall?
- The hardware
- Why OpenBSD?
- The network
- DHCP
- PF - A packet filtering firewall
- DNS
- Appendix
Typographical conventions used in this guide
Fixed-width(mono-spaced) font is used for terminal commands, file names and paths, configuration parameters, etc.- Terminal commands that must be typed as the
rootuser is prefixed with the#pound sign and the command is in bold text. - Terminal commands that can be typed as the regular user is prefixed with the
$dollar sign and the command is in bold text.
Why a firewall?
NOTE: Currently this guide only deals with IPv4 as most people still don't use IPv6 and many ISPs also still only use IPv4, but IPv6 is planned for a future update of the guide.
Almost no matter how you connect to the Internet from your home or office, you need a real firewall between you and the modem or router that your ISP has provided you with.
Very rarely do consumer-grade modems or routers get firmware updates and they are often vulnerable to network attacks that turns these devices into botnets, such like the Mirai malware. Many consumer-grade modems and routers is to blame for some of the largest distributed denial of service (DDoS) attacks.
A firewall between you and your ISP modem or router cannot protect your modem or router device against attacks, but it can protect your computers and devices on the inside of the network, and it can help you monitor and control the traffic that comes and goes to and from your local network.
Without a firewall between your local network and the ISP modem or router you could basically consider this an open door policy, like leaving the door to your house wide open, because you cannot trust the equipment from your ISP.
It is always a really good idea to put a real firewall between your local network and the Internet, and with OpenBSD you get an very solid solution.
The hardware
You don't have to buy expensive hardware to get an effective router and firewall for your house or office. Even with cheap and "low end" hardware you can get a very solid solution.
I have build multiple solutions with the ASRock Q1900DC-ITX motherboard that comes with an Intel Quad-Core Celeron processor.
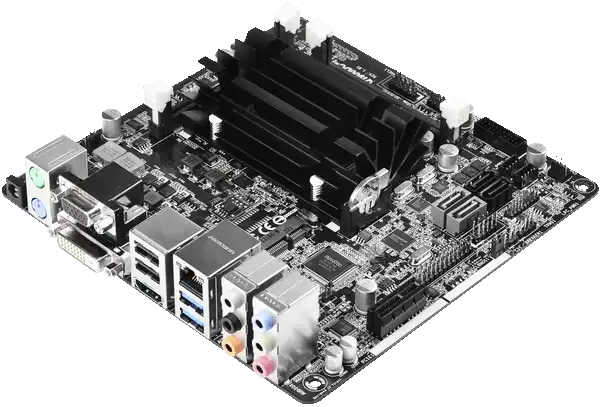
I'll admit, it's a pretty "crappy" motherboard, but it gets the job done and I have several builds that have run very solid for many years on gigabit networks with full saturation and the firewall, DNS, etc. working "overtime" and the CPU hardly breaks a sweat.
The ASRock Q1900DC-ITX motherboard has the advantage that it comes with a DC-In Jack that is compatible with a 9~19V power adapter, making it very power saving. Unfortunately the ASRock Q1900DC-ITX motherboard is no longer made, but I'm just using it as an example, I have used several other cheap boards as well.
NOTE: Many other low power brands from other motherboard producers can be uses as well, such as the famous APU2 from PC Engines. Another option is one of the Mini PC's from Qotom or Jetway.
I have also used the ASRock Q1900-ITX (it doesn't come with the DC-In Jack) combined with a PicoPSU.
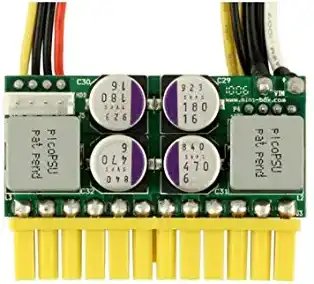
You can find different brands and versions of the PicoPSU, some are better quality than others. I have two different brands, the original and a cheaper knockoff, both performs very well and they save quite a bit of power contrary to running with a normal power supply.
Last, I am using a cheap Intel knockoff quad port NIC found on Ebay like this one:

I know it is better to use quality hardware, especially on a network that you care about, but this tutorial is about how you can get away with using fairly cheep hardware and still get an extremely useful product that will continue to serve you well for many years - at least that is my experience.
I recommend that you look for a low power mini ITX board with hardware supported by OpenBSD, such as an Intel Celeron or Intel i3 processor. These boards are typically cheap, less power hungry, and they don't take up much space. I don't recommend using the Intel Atom CPU if you have a gigabit network as they usually choke because they can't handle the amount of traffic, but your mileage may vary.
You might also need a couple of cheap gigabit switches for the segmented local network, at least if you have more than one computer you want to connect to the same LAN :)
Why OpenBSD?
In truth, you can get a somewhat similar setup with one of the other BSD flavors or one of the many different Linux distribution, but OpenBSD is specifically very well suited and designed for this kind of task. Not only does it come with all the needed software in the base install, but it also has significantly better security and tons of improved mitigations already build-in into the operating system. I highly recommend OpenBSD over any other operating system for this kind of task.
Furthermore, OpenBSD is special, and this is not an exaggeration. The manual pages are very readable and often the only information you need to, more or less, effortless create configuration files for the various services you need. The OpenBSD project has a very high level of quality requirements for both the software and the manual pages.
This guide is not going to show you how to install OpenBSD. If you haven't done that before I recommend you spin up some kind of virtual machine or see if you have some unused and supported hardware laying around you can play with. OpenBSD is one of the easiest and quickest operating systems to install. Don't be afraid of the non-gui approach, once you have tried it you will really appreciate the simplicity. Use the default settings when in doubt.
Before you endeavor on this journey make sure to reference the OpenBSD documentation! Not only is everything very well documented, but you will most likely find all the answers you need right there. Read the OpenBSD FAQ and take a look at the different manual pages for the software we're going to use.
Another really useful place to find general information about OpenBSD is the OpenBSD mailing list archives. Also make sure to stay up to date with relevant information by subscribing to the Announcements and security advisories mailing list.
TIP: Please consider supporting OpenBSD! Even if you don't use OpenBSD on a daily basis, but perhaps make use of OpenSSH on Linux, then you're really using software from the OpenBSD project. Consider making a small, but steady donation to support the further development of all the great software the OpenBSD developers make!
The network
A router is basically a device that regulate network traffic between two or more separate networks. The router will ensure that network traffic intended for the local network doesn't run out into the wild on the Internet, and traffic on the Internet, that is not intended for your local network, stays on the Internet.
NOTE: A router is sometimes also referred to as a gateway, which generally is alright, but in truth a real gateway joins dissimilar systems, while a router joins similar networks. An example of a gateway would be a device that joins a computer network with a telecommunications network.
In this tutorial we're building a router and we have 4 networks of the same type to work with. One is the Internet and the other three are the internally segmented local area networks (LANs). Some people prefer to work with virtual LANs, but in this tutorial we're going to use the quad port NIC from the illustration above. You can achieve the same result by using multiple one port NICs if you prefer that, you just have to make sure that you have enough room and free PCI slots on the motherboard. You can also use the Ethernet port on the motherboard itself, but it depends on the driver and support for the device. I have had no problems using the Realtek PCI gigabit Ethernet controller that normally comes with many motherboards even though I recommend Intel over Realtek.
Of course you don't have to segment the network into several parts if you don't need that, and it will be very easy to change the settings from this guide, but I have decided to use this approach in order to show you how you can protect your children by segmenting their network into a separate LAN that not only gets ad and porn blocking using DNS blocking (all the segments gets that), but you can even make a pass list that passes only the parts of the Internet you want them to have access to. The last part about a pass list is difficult and generally not recommended unless your children requires only very limited access, but it is doable with some work, and the guide is going to show you one way you can do that.
This is an illustration of the network we're going to setup:
                       Internet
                          |
                    xxx.xxx.xxx.xxx
                    ISP Modem (WAN)
                      10.24.0.23
                          |
                       OpenBSD
                      10.24.0.50
                  (router/firewall)
                          |
     ┌────────────────────+────────────────────┐
     |                    |                    |
    NIC1                 NIC2                 NIC3 (DMZ)
192.168.1.1          192.168.2.1          192.168.3.1
LAN1 switch          LAN2 switch          LAN3 switch
     |                    |                    |
     └─ 192.168.1.x       ├─ 192.168.2.x       └─ 192.168.3.2
        Grown-up PC       |  Child PC1            Public web server
                          |
                          └─ 192.168.2.x
                             Child PC2
The IP addresses that begins with 10.24.0 are whatever IP addresses your ISP router or modem gives you, it may be something very different. The IP addresses beginning with 192.168 are the IP addresses that we're going to use in the guide for our local area network (LAN).
The guide does not deal with any kind of wireless connectivity. Wireless chip firmware is notoriously buggy and exploitable and I recommend you don't use any kind of wireless connectivity, if you can do without. If you do require wireless connectivity I strongly recommend that you disable wireless access from the ISP modem or router completely (if possible), and then buy the best wireless router you can find and put it behind the firewall in an isolated segment instead. That way should your wireless device ever be compromised you can better control the outcome and limit the damage. You can further setup the wireless router such that any devices connected to it have their own IPs that pass directly through the wireless router, but at the same time block traffic directly originating from the wireless router itself. That way you can prevent the wireless router from "phoning home". You can also get a wireless adapter supported by OpenBSD and have your OpenBSD router run as the actual access point, however I much prefer to segment the wireless part to either a separate wireless router or another OpenBSD machine serving as a wireless access point behind the firewall itself.
NOTE: At present, as far as I know, none of the OpenBSD wireless drivers are fully without problems yet.
Setting up the network
The first thing we'll setup is the different NICs on our OpenBSD router. On my particular machine I have disabled the NIC that is build into the motherboard via the BIOS and I am only going to use the four port Intel knockoff NIC.
If you're following this tutorial and only want a basic firewall then you need at least two separate NICs.
Before we begin make sure you have read and understood the different options in hostname.if man page. Also take a look at the networking section in the OpenBSD FAQ.
Since I am using Intel the em driver is the one OpenBSD loads and each port on the NIC is listed as a separate card. This means that each card is listed with emX where X is the actual number of the port on the given card.
A dmesg lists my NIC with the four ports like this:
# dmesg
em0 at pci2 dev 0 function 0 "Intel I350" rev 0x01: msi, address a0:36:9f:a1:66:b8
em1 at pci2 dev 0 function 1 "Intel I350" rev 0x01: msi, address a0:36:9f:a1:66:b9
em2 at pci2 dev 0 function 2 "Intel I350" rev 0x01: msi, address a0:36:9f:a1:66:ba
em3 at pci2 dev 0 function 3 "Intel I350" rev 0x01: msi, address a0:36:9f:a1:66:bb
This shows that my card is recognized as an Intel I350-T4 PCI Express Quad Port Gigabit NIC.
The next thing is to figure out which port that physically matches the number listed above. You can do that by manually plugging in an Ethernet wire, coming from an active (turned on) switch, modem or router, into each port, one at a time, in order to see which port gets activated and then note that down somewhere.
You can check the activity status with the ifconfig command. A port without the Ethernet cable will be listed as no carrier in the status field, whereas the port with the cable attached will be listed as active. Like this:
# ifconfig
em1: flags=8843<UP,BROADCAST,RUNNING,SIMPLEX,MULTICAST> mtu 1500
        lladdr a0:36:9f:a1:66:b9
        index 2 priority 0 llprio 3
        media: Ethernet autoselect (none)
        status: active
em2: flags=8843<UP,BROADCAST,RUNNING,SIMPLEX,MULTICAST> mtu 1500
        lladdr a0:36:9f:a1:66:ba
        index 3 priority 0 llprio 3
        media: Ethernet autoselect (none)
        status: no carrier
We're going to use the em0 port as the one we connect to the modem or router from the ISP, i.e. the Internet. In my specific case I have a public IP address from my ISP, and you're going to need that if you want to run something like a web server from your home, but in case you don't need that you can setup the card with DHCP.
In my case I need to put in a specific fixed IP address for em0 which then gets traffic forwarded by my ISP from my public IP. To do that I set the em0 card with the following information:
# echo 'inet 10.24.0.50 255.255.254.0 NONE' > /etc/hostname.em0
If you don't need a public IP address and you get your IP from your ISP via DHCP, then just enter dhcp instead:
# echo 'dhcp' > /etc/hostname.em0
Then I'll set the rest of the NIC ports up with the IP addresses I have previously illustrated.
# echo 'inet 192.168.1.1 255.255.255.0 NONE' > /etc/hostname.em1
# echo 'inet 192.168.2.1 255.255.255.0 NONE' > /etc/hostname.em2
# echo 'inet 192.168.3.1 255.255.255.0 NONE' > /etc/hostname.em3
Take a look at hostname.if for more information.
Then I need to setup the IP of the ISP gateway. Depending on the setup of your ISP this might be another IP address than the one from the ISP modem or router. If you don't add the /etc/mygate then no default gateway is added to the routing table. You don't need the /etc/mygate if you get your IP from your ISP modem or router via DHCP. If you use the dhcp directive in any hostname.ifX then the entries in /etc/mygate will be ignored. This is because the card that get its IP address from a DHCP server will also get gateway routing information supplied.
Last, but not least, we need to enable IP forwarding. IP forwarding is the process that enables IP packets to travel between network interfaces on the router. By default OpenBSD will not forward IP packets between various network interfaces. In other words, routing functions (also known as gateway functions) are disabled.
We can enable IP forwarding using the following commands:
# sysctl net.inet.ip.forwarding=1
# echo 'net.inet.ip.forwarding=1' >> /etc/sysctl.conf
Now OpenBSD will be able to forward IPv4 packets from one NIC to another. Or, as in our specific case with the four port NIC, from one port to another. Take a look at the man page if you need IPv6.
DHCP
Now we're ready to setup the Dynamic Host Configuration Protocol (DHCP) service we will be running for our different PCs and devices attached to the different LANs. Before we begin make sure you have read and understood the different options in the dhcpd.conf man page. Also take a look at the dhcp-options man page for options that dhcpd supports.
We have the option to bind specific IP addresses to specific computers or devices that connect to our different LAN ports. This is needed if we want to forward any traffic from the Internet to something like a web server. We can bind a specific IP address to a specific computer via the MAC address on the NIC of the relevant machine.
In this case I'll reserve all IP addresses ranging from 10 to 254 for the DHCP, while I'll leave the few left overs for any possible fixed addresses I might need.
Edit /etc/dhcpd.conf with your favorite text editor and set it up to suit your needs.
subnet 192.168.1.0 netmask 255.255.255.0 {
    option domain-name-servers 192.168.1.1;
    option routers 192.168.1.1;
    range 192.168.1.10 192.168.1.254;
}
subnet 192.168.2.0 netmask 255.255.255.0 {
    option domain-name-servers 192.168.2.1;
    option routers 192.168.2.1;
    range 192.168.2.10 192.168.2.254;
}
subnet 192.168.3.0 netmask 255.255.255.0 {
    option domain-name-servers 192.168.3.1;
    option routers 192.168.3.1;
    range 192.168.3.10 192.168.3.254;
    host web.example.com {
        fixed-address 191.168.3.2;
        hardware ethernet 61:20:42:39:61:AF;
        option host-name "webserver";
    }
}
The option domain-name-servers line specifies the DNS server we will be running on our router.
Also the computer serving as our web server on the public LAN has gotten a fixed IP address and provided a fixed hostname.
Also, if you don't want to segment the network into the different parts, but only want to have one LAN then you can just leave out the other subnets so you just have this:
subnet 192.168.1.0 netmask 255.255.255.0 {
    option domain-name-servers 192.168.1.1;
    option routers 192.168.1.1;
    range 192.168.1.10 192.168.1.254;
}
Then we just need to make sure we enable and start the dhcpd service:
# rcctl enable dhcpd
# rcctl start dhcpd
NOTE: Take a look at the Adding the domain-name option to DHCP and using a FQDN in the appendix for information on how to easily add a fully qualified domain name (FQDN) to your setup and how you can use the domain-name option in DHCP to avoid having to type the FQDN each time you need it. The section will also show you how you can avoid having to remember IP addresses if your LAN has multiple computers or devices attached.
PF - A packet filtering firewall
A packet-filtering firewall examines each packet that crosses the firewall and decides whether to accept or deny individual packets, based on examining fields in the packet's IP and protocol headers, according to the set of rules that you specify.
Packet filters work by inspecting the source and destination IP and port addresses contained in each Transmission Control Protocol/Internet Protocol (TCP/IP) packet. TCP/IP ports are numbers that are assigned to specific services that identify which service each packet is intended for.
A common weakness in simple packet filtering firewalls is that the firewall examines each packet in isolation without considering what packets have gone through the firewall before and what packets may follow. This is called a "stateless" firewall. Exploiting a stateless packet filter is fairly easy. PF from OpenBSD is not a stateless firewall, it is a stateful firewall.
A stateful firewall keeps track of open connections and only allows traffic that either matches an existing connection or opens a new allowed connection. When state is specified on a matching rule the firewall dynamically generates internal rules for each anticipated packet being exchanged during the session. It has sufficient matching capabilities to determine if a packet is valid for a session. Any packets that do not properly fit the session template are automatically rejected.
One advantage of stateful filtering is that it is very fast. It allows you to focus on blocking or passing new sessions. If a new session is passed, all its subsequent packets are allowed automatically and any impostor packets are automatically rejected. If a new session is blocked, none of its subsequent packets are allowed. Stateful filtering also provides advanced matching abilities capable of defending against the flood of different attack methods employed by attackers.
Network Address Translation (NAT) enables the private network behind the firewall to share a single public IP address. NAT allows each computer in the private network to have Internet access, without the need for multiple Internet accounts or multiple public IP addresses. NAT will automatically translate the private network IP address for computers or devices on the network to the single public IP address as packets exit the firewall bound for the Internet. NAT also performs the reverse translation for returning packets. With NAT you can redirect specific traffic, usually determined by port number or a range of port numbers, coming in on your public IP address from the Internet to a specific server or servers located somewhere in your local network.
Packet Filter (PF) is OpenBSD's firewall system for filtering TCP/IP traffic and doing NAT. PF is also capable of normalizing and conditioning TCP/IP traffic, as well as providing bandwidth control and packet prioritization.
PF is actively maintained and developed by the entire OpenBSD team.
PF setup
Before we begin I assume that you have read both the PF - User's guide and the pf.conf man page, especially the man page is very important. Even if you don't understand all the different options make sure you read the documentation! For a complete and in-depth view of what PF can do, take a look at the pf man page.
Also, let me start by saying that even though the syntax for PF is very readable, it is very easy to make mistakes when writing firewall rules. Even senior and experienced system administrators makes mistakes when writing firewall rules.
Writing firewall rules requires that you carefully plan out your goals, understand how to implement the different rules in order to achieve the desired results, and at the same time take your precautions against doing it wrong and accidentally logging yourself out :) I think we've all done that at one time or another, whether in haste, tiredness, or just by mistake, I know I have several times.
NOTE: Please note that I have done my best to keep things as simple as possible and to use lots of comments in order to explain what each rule does. At the same time I have tested each rule out and monitored the impact and generally done my best to avoid complications and mistakes.
The most important part is that you don't make any assumptions. Always test your rules thoroughly. If something isn't working, try to remove as much as possible from your rules so you're left with the very basic. Then introduce one rule at a time until you reach the point where a rule is causing problems. Then deal with the setup step by step.
The really difficult part is to remember how data packets arrive at one NIC and how they are then forwarded to a machine on another NIC, and then relating this "journey" correctly to the terms pass in, pass out, block in, block out, from and to. These terms often does not work exactly as we tend to think.
The way I try to think about it is more or less to actually imagine myself "flowing along with the data" and standing in a particular NIC port looking at data coming in and out. That way I remember to consider data "coming" from a specific device attached to a specific port going "in" or "out" etc. It sounds silly, but it has helped me more than once.
Clarifications
I want to start by clarifying some of the common default settings and keywords in PF.
When we talk about traffic that we pass in or pass out, one good way to remember what we're dealing with is to think in terms of data packets. We pass in data packets coming from computers to a NIC (the computers attached to that NIC) and we pass out data packets coming from the NIC to the computers attached to it.
The format is either that we then filter data packets on the destination:
from source IP to destination IP [on] port
Or we filter data packets on the source:
from source IP [on] port to destination
Please note that the [on] part is not part of the PF syntax.
quickIf a packet matches a
pass,blockormatchrule, with thequickmodifier, the packet is passed without inspecting subsequent filter rules. The rule with thequickmodifier becomes the last matching rule.
keep stateYou don't need to specify the
keep statemodifier for specificpassorblockrules. The first time a packet matches apassorblockrule, a state entry is created by default.Only if no rule matches a packet, the default action is to pass the packet without creating a state.
oninterface/anyThis rule applies only to packets coming in on, or going out through, this particular interface or interface group.
The
on anymodifier - will match any existing interface except loopback ones.
inet/inet6The
inetandinet6modifiers means that this rule applies only to packets coming in on, or going out through, this particular routing domain, meaning IPv4 or IPv6.You can apply rules to specific routing domains without specifying the NIC. In that case the rule will match all traffic of that particular nature on all NICs. By specifying
inetyou explicitly address IPv4 traffic only.
protoinandoutThis is one of the easiest parts of traffic direction to get wrong. A packet always comes in on, or goes out through, the Ethernet port on the Ethernet interface.
inandoutapply to incoming and outgoing packets through the physical Ethernet port where the Ethernet cable is attached. If neither are specified, the rule will match packets in both directions.inandoutis never used to deal with traffic going from one NIC to another NIC, that is done with network address translation (NAT), using the optionsnat-toandrdr-to.inandoutonly deals with traffic in and out from the physical Ethernet port on the card.
fromandtoThe
fromandtorule modifiers apply only to packets with the specified source and destination addresses and ports. Both the hostname or IP address, port, and OS specifications are optional.When we're dealing with a router with multiple NICs it's easy to think like this: I want to pass in packets from the external NIC (the NIC attached to the Internet) and then have them go to the first LAN NIC and from there out to a specific computer on that LAN, meaning we follow the "trail of data" in our minds, and then write that out into something like this:
pass in on $ext_if from $ext_if to $dmz port 80. But this will not make the HTTP traffic "magically" appear on port 80 on the LAN with a computer attached with a specific IP address. We would also require a specificpass outrule and furthermore need to determine exactly on which machine we want the data to end up. Unless you are really dealing with a very specific requirement, you never need such rules in your ruleset! The Unicast Reverse Path Forwarding (uRPF) features of PF will protect your internal network very well and with a basic setup of correct network address translation (NAT), with thenat-tooption, and redirection with therdr-tooption, PF will handle the packages from the inside to the outside and vice versa.The
allparameter is equivalent to writingfrom any to any. Without explicitly declaring the direction, the default isfrom any to any. This rule:pass in on $dmz proto udp to port dnstranslates into this:pass in on em3 inet proto udp from any to any port = 53There is also no need to use
to any port dns, theanypart is the default. You do however need theto port dns
nat-toandrdr-toNetwork address translation (NAT) options modify either the source or destination address and port of the packets associated with a stateful connection. PF modifies the specified address and/or port in the packet and recalculates IP, TCP, and UDP checksums as necessary.
A
nat-tooption specifies that IP addresses are to be changed as the packet traverses the given interface. This technique allows one or more IP addresses on the translating host (the OpenBSD router) to support network traffic for a larger range of machines on an inside network, i.e. a LAN.The
nat-tooption is usually applied outbound, meaning redirected from the inside network to the Internet.nat-toto a local IP address is not supported.The
rdr-tooption is usually applied inbound, meaning redirected from the Internet into the inside network.
- List items and range of addresses and ports
When you need to specify multiple items, e.g. multiple port numbers, you can separate them with a whitespace or a comma. Like this
port { 53 853 }or like thisport { 53, 853 }Ranges of addresses are specified using the
-operator. e.g.192.168.1.2 - 192.168.1.10means all IP addresses from 192.168.1.2 until 192.168.1.10, both included.Range of ports has multiple parameters, look at the man page for pf.conf and search for the text
Ports and ranges of ports are specified using these operators
.
WARNING: Please note that each time a packet processed by the packet filter comes in on or goes out through a network interface, the filter rules are evaluated in sequential order, from first to last. For block and pass, the last matching rule decides what action is taken. If no rule matches the packet, the default action is to pass the packet without creating a state. For match, rules are evaluated every time they match.
Domain name or hostname resolution
If you decide to use hostnames and/or domain names in your PF setup you need to know that all domain name and hostname resolution is done at ruleset load-time. This means that when the IP address of a host or a domain name changes, the ruleset must be reloaded for the change to be reflected in the kernel. It is not such that each time a specific rule runs, that has a hostname or domain name listed, that PF will do a new DNS lookup for that particular hostname or domain name. DNS lookup only happens when the ruleset is loaded.
This also means that you must make sure that the DNS server you're using is up and running before PF is started, otherwise PF will fail at loading the ruleset because it cannot resolve the hostname or domain name.
On OpenBSD PF starts before Unbound or any other installed DNS server, which is the correct thing to do from a security perspective.
I advice that you avoid using hostnames or domain names when using PF rules and stick to IP addresses if possible. It is possible to use hostnames and domain names, but direct IP addressing is by far the easiest and safest.
The ruleset
It is a good idea to test out your ruleset on a test machine. There is often more than one way to achieve the same result. In my humble opinion, the best way is the way that is most clear to you (i.e. easy to understand).
WARNING: Never write new rulesets on a remote device you are actively logged into unless you really know what you're doing. Getting logged out of a remote machine is never any fun.
Try to figure out how you can keep your rules as clear and as short as possible, using default values whenever possible. Yet, don't be afraid to specify modifiers that makes the rules more clear to understand, even though they are identical to the default values. A default value might be any to any, and you can leave that out then, but it might be easier to understand a particular rule when it actually says any to any in the text of the configuration file.
You can always parse the ruleset and check for errors without it being deployed with the command pfctl -nf /etc/pf.conf. Once you have loaded a ruleset with the command pfctl -f /etc/pf.conf you can view how the ruleset has been translated by PF with the pfctl -s rules command, which I advice that you to use regularly.
I prefer to keep my rulesets organized with sections and comments so I'll do the same in this example.
Use your favorite text editor and open up the file /etc/pf.conf.
First we setup some macros to better remember what NICs we use for what. Using macros for the NICs also makes it easy to change the driver name of the card if we ever buy a new card, or multiple new cards.
#---------------------------------#
# Macros
#---------------------------------#

ext_if="em0" # External NIC connected to the ISP modem (Internet).
g_lan="em1"  # Grown-ups LAN.
c_lan="em2"  # Children's LAN.
dmz="em3"    # Public LAN (DMZ).
Next we set up a table for non-routable IP address. We do that because a very common network misconfiguration is the kind that lets traffic with non-routable addresses out to the Internet. We will use the table in our ruleset to block any attempt to initiate contact to non-routable addresses through the routers external NIC.
#---------------------------------#
# Tables
#---------------------------------#

# This is a table of non-routable private addresses.
table <martians> { 0.0.0.0/8 10.0.0.0/8 127.0.0.0/8 169.254.0.0/16     \
                   172.16.0.0/12 192.0.0.0/24 192.0.2.0/24 224.0.0.0/3 \
                   192.168.0.0/16 198.18.0.0/15 198.51.100.0/24        \
                   203.0.113.0/24 }
WARNING: Please note that macros and tables always goes at the top of /etc/pf.conf.
Then we begin with a default blocking policy and setup a couple of protective features.
#---------------------------------#
# Protect and block by default
#---------------------------------#

set skip on lo0

# Spoofing protection for all NICs.
block in from no-route
block in quick from urpf-failed

# Block non-routable private addresses.
# We use the "quick" parameter here to make this rule the last.
block in quick on $ext_if from <martians> to any
block return out quick on $ext_if from any to <martians>

# Default blocking all traffic in on all LAN NICs from any computer or device
# attached.
block return in on { $g_lan $c_lan $dmz }

# Default blocking all traffic in on the external NIC from the Internet/ISP,
# we'll log that too.
block drop in log on $ext_if

# Allow ICMP.
match in on $ext_if inet proto icmp icmp-type {echoreq } tag ICMP_IN
block drop in on $ext_if proto icmp
pass in proto icmp tagged ICMP_IN max-pkt-rate 100/10

# We need the router to have access to the Internet, so we'll default allow
# packets to pass out from our router through the external NIC to the Internet.
pass out inet from $ext_if
The IP addresses in the martians macro constitutes the RFC1918 addresses which are not to be used on the Internet. As these IP addresses doesn't belong on the Internet they are called "martians", as they might as well have come from Mars. These addresses are also called bogons. Traffic to and from such addresses is dropped on the routers external interface.
NOTE: Even though we implicitly block the "martians" IP address in the block drop in log on $ext_if statement, which is blocking everything by default, we still block the "martians" IP addresses explicitly first. This is a best practice because even with a properly configured router to handle network address translation, we need to take precautions against misconfiguration by mistake. A common misconfiguration is to let traffic with non-routable addresses out to the Internet. Since traffic from non-routeable addresses can play a part in several DoS attack techniques and other issues, consider explicitly blocking traffic from non-routeable addresses from entering the network through the external interface a "best practice" from a security point of view.
In previous versions of this guide (before version 1.5.0) I used to have the scrub statement present in the setup above, however after having consulted with Henning Brauer from the OpenBSD team (thanks Henning!) and doing some further research, I have decided to remove it as it deals with very specific corner cases (please see the documentation). You only need the scrub rule if a host on your network generates fragmented packets with the "dont‑fragment" flag set. The default PF behavior without the scrub rule is better suited for general usage.
The OpenBSD FAQ contains an example setup for a very basic router, with some specific values for scrub, but my recommendation is to only use scrub when you know for a fact that you need it. If you do need it, insert it into the configuration after the set skip rule for the loopback interface, like this:
set skip on lo0
match in all scrub
Then add whatever parameters to the scrub rule you need.
I also used to have the following antispoof rule present in the spoofing protection section:
antispoof quick for { $g_lan $c_lan $dmz }
I have since removed the antispoof rule since the Unicast Reverse Path Forwarding (uRPF) feature of PF provides the same functionality as antispoof rules, and as such we don't need it any longer, instead we just use the block in quick from urpf-failed rule.
The following information about the antispoof modifier is kept for educational purposes.
Spoofing is when someone fakes an IP address. The antispoof modifier expands to a set of filter rules that will block all traffic with a source IP from the network (directly connected to the specified interface) from entering the system through any other interface. This is sometimes referred to as "bleeding over" or "bleeding through".
The above antispoof directive is translated by PF into the following:
block drop in quick on ! em1 inet from 192.168.1.0/24 to any
block drop in quick inet from 192.168.1.1 to any
block drop in quick on ! em2 inet from 192.168.2.0/24 to any
block drop in quick inet from 192.168.2.1 to any
block drop in quick on ! em3 inet from 192.168.3.0/24 to any
block drop in quick inet from 192.168.3.1 to any
If we take, e.g., the em1 NIC rule block drop in quick on ! em1 inet from 192.168.1.0/24 to any then that means: block any traffic from the network with IP addresses ranging from 192.168.1.1 to 192.168.1.255, that doesn't originate from the em1 NIC itself, and that is going anywhere. Since the em1 NIC is the NIC in charge of all IP addresses in that specific range, then no traffic with such an IP address should originate from any other NIC.
WARNING: Usage of antispoof should be restricted to interfaces that have been assigned an IP address, meaning that if you have unused NICs, or ports on a NIC, make sure to assign an IP address to each or don't include these in the antispoof option.
As mentioned, I have removed the antispoof rule and we are instead using a strict uRPF check. When a packet is run through the uRPF check, the source IP address of the packet is looked up in the routing table. If the outbound interface is found in the routing table and the entry is the same as the interface that the packet just came in on, then the uRPF check passes. Otherwise it's possible that the packet has had its source address spoofed and it is blocked.
We are allowing ICMP in our setup, even though some network administrators completely block ICMP. People mainly block ICMP completely because of unwarranted actions such as network discovery attacks, covert communication channels, ping sweep, ping flood, ICMP tunneling and ICMP redirecting. However, ICMP is much more than answering pings. If we block ICMP completely, diagnostics, reliability, and network performance may suffer as a result because important mechanisms are disabled when the ICMP protocol is restricted.
Some of the reasons why ICMP shouldn't be blocked:
- Path MTU discovery (PMTUD) is used to determine the maximum transmission unit size on network devices that connects the source and destination to avoid IP fragmentation. TCP depends on ICMP packets of type 3 code 4 for "Path MTU Discovery". ICMP type 3, code 4, and max packet size are returned when a packet exceeds the MTU size of a network device on the connected path. When these ICMP messages are blocked, the destination system continuously requests undelivered packets and the source system continues to resend them infinitely but to no avail. The behaviour can result in an ICMP black hole (congested IP connections and broken transmissions).
- Time to live (TTL) defines the lifespan of a data packet. A network with ICMP blocked will not receive type 11, time exceeded, code 0, time exceeded in transit error messages. This means that the source host will not be notified to increase the lifespan of the data to successfully reach the destination, if the datagram fails to reach the destination.
- Poor performance because of blocking ICMP redirect. ICMP redirect is used by a router to inform a host of a direct path from the source host to a destination host. This reduces the amount of hops data has to travel through to reach the destination. With ICMP blocked, the host will not be aware of the most optimal route to the destination.
In the above setup we allow ICMP, but put a "rate limit" on the number of ping requests the router will answer. With the max-pkt-rate 100/10 modifier the router will stop responding to pings if we get a more than a 100 pings in 10 seconds.
NOTE: Should you still want to completely block ICMP for some reason, simply remove the 3 rules after the "Allow ICMP" comment.
Now we get to the LAN segment for the grown-ups in the house.
#---------------------------------#
# Grown-ups LAN Setup
#---------------------------------#

# Allow any computer or device on the grown-ups LAN to send data packets in
# through the NIC. This means any computer attached to this network interface
# can pass in data reaching anywhere, i.e. the Internet or any of the computers
# attached to the router.
pass in on $g_lan

# Always block DNS queries not addressed to our DNS server.
block return in quick on $g_lan proto { udp tcp } to ! $g_lan port { 53 853 }

# I have a network printer I don't want to "phone home", so I block that.
# The network printer has the IP address 192.168.1.8.
block in quick on $g_lan from 192.168.1.8

# Allow data packets to pass from the router out through the NIC to the
# computers or devices attached to it on the grown-ups NIC.
# Without this we can't even ping computers attached to the grown-ups NIC from
# the router itself.
pass out on $g_lan inet keep state
In this example I have a network printer attached to the grown-ups network that I don't want to access the Internet or anywhere else (just in case it has some kind of spying firmware). I do that by saying, block all data coming in on em1 from the IP address 192.168.1.8 going to any IP address.
Also we make sure that all DNS requests on port 53 (regular DNS) and 853 (DNS over TLS) are always blocked if they are not addressed to our DNS server.
NOTE: Previously I used to redirect all traffic on port 53 not addressed to our DNS server back to our DNS server. I did that because when we block the DNS request on port 53, whether with a return or drop, the request will timeout on the client, which will make most clients cause a delay in the reply. I have since changed it to a block because I believe that it is the more correct approach. All clients need to realize that communication on port 53 is blocked, unless it is addressed to our DNS server. This is also important when we're troubleshooting our network. If we get a redirected reply from our DNS server we might not notice that we have been redirected.
NOTE: DNS primarily uses the User Datagram Protocol (UDP) on port number 53 to serve requests, but when the length of the answer exceeds 512 bytes and both client and server support EDNS, larger UDP packets are used. Otherwise, the query is sent again using the Transmission Control Protocol (TCP). Some DNS resolver implementations use TCP for all queries. As such we need both the UDP and TCP protocols in rule for port 53.
The childrens part of the LAN is very similar.
#---------------------------------#
# Childrens LAN Setup
#---------------------------------#

# Allow any computers or devices on the childrens LAN to send data packets in
# through the NIC. This means any computer attached to this network interface
# can pass in data reaching anywhere, i.e. the Internet or any of the computers
# attached to the router.
pass in on $c_lan

# Always block DNS queries not addressed to our DNS server.
block return in quick on $c_lan proto { udp tcp} to ! $c_lan port { 53 853 }

# Allow data packets to pass from the router out through the NIC to the
# computers or devices attached to it on the grown-ups NIC.
# Without this we can't even ping computers attached to the childrens NIC from
# the router itself.
pass out on $c_lan inet keep state
Currently both the grown-ups and the children have the same access to the Internet. A more restricted setup is mentioned in the childrens pass list section.
Then we get to the DMZ, i.e. the NIC with a publicly facing web server. Since we have a publicly facing web server we set up a couple of restrictions. Should the web server ever get compromised the intruder will have a hard time figuring out what else is located on our internal network.
We block all access except for DHCP, in order for the web server to get an IP address from our router, and then only manually open other things up whenever we need to update the machine or do something else. I have commented out the options we need, when we need to open things up, leaving the restricting parts enabled. When you need to update the server you open up for DNS and general access to the Internet.
NOTE: Rather than manually changing the ruleset each time we need to open up for the web server to be updated, we can also use an anchor, but for simplicity's sake we don't do that here.
#---------------------------------#
# DMZ Setup
#---------------------------------#

# Allow any computer or device attached to the DMZ NIC to make DNS queries
# (uncomment if you need it).
#pass in on $dmz inet proto udp from any port 53

# Always block DNS queries not addressed to our DNS server on the router.
block return in quick on $dmz proto { udp tcp} to ! $dmz port { 53 853 }

# When you want any computer attached to the DMZ NIC to access the Internet
# uncomment this to open up for access. This is relevant when you need to
# upgrade a computer.
#pass in on $dmz inet

# No matter what, we do not want the DMZ segment to reach any of the other
# network segments so we explicitly use a block last.
#
# We have several options. If we use this:
#
#   block drop in on $dmz to 192.168/16
#
# Then we block for all subnets, but this also means that the computers
# attached to the DMZ NIC cannot do DNS queries when they need to be upgraded.
#
# In my opinion it is much better to be explicit and block the specific
# segments we want blocked.
#
# This blocks computers on the DMZ NIC from reaching any computers or devices
# on the other two networking segments.
block drop in on $dmz to { $g_lan:network $c_lan:network }

# Last, we need to pass out data packets coming from the DMZ NIC to computers
# attached to it, otherwise nobody can "talk" to them.
# Without this we cannot even ping computers attached to the DMZ NIC from the
# router itself.
pass out on $dmz inet keep state
Now we come to the network address translation (NAT). This is where the router routes packages from one segment of the network to another, in this specific case from our internal network to the Internet outside, and then any reply coming from the Internet outside, back in to the originator of the transmission. I prefer the :network parameter, which translates to the network(s) attached to the NIC, and I prefer to be specific with one rule for each relevant segment.
#---------------------------------#
# NAT
#---------------------------------#

pass out on $ext_if inet from $g_lan:network to any nat-to ($ext_if)
pass out on $ext_if inet from $c_lan:network to any nat-to ($ext_if)
pass out on $ext_if inet from $dmz:network to any nat-to ($ext_if)
PF will keep a track of all traffic and when e.g. a web browser on the grown-ups LAN requests a web page on some website on the Internet, the response from the web server on the Internet gets routed through our external NIC through to our internal grown-ups LAN NIC and then straight to the computer that originated the request.
Last we get to the redirecting part of our ruleset. This is where we allow traffic from the Internet outside in to our publicly facing web server on the DMZ NIC. You should, of course, leave this part out if you don't have any publicly facing servers that requires redirection. In this example I'm only allowing IPv4 traffic.
#---------------------------------#
# Redirects
#---------------------------------#

# Our web server is 192.168.3.2 - let the Internet have access to it.
pass in on $ext_if inet proto tcp to $ext_if port { 80 443 } rdr-to 192.168.3.2
WARNING: Redirects always goes last in the ruleset!
That's it for our basic setup of firewall rules.
The childrens pass list
If you want to block the entire Internet for the children with the exception of a few websites or perhaps a few game servers, you need to figure out what the IP addresses of those services are and create a pass list using those IP addresses.
If it is a single website with a single IP address it is very easy and you can do it with this rule placed last in the childrens section (you need to replace the x.x.x.x part with the relevant IP address):
#---------------------------------#
# Childrens LAN Setup
#---------------------------------#

# Allow any computer or device attached to the childrens NIC to make DNS
# queries.
pass in on $c_lan inet proto udp from any port 53

# Always block DNS queries not addressed to our DNS server.
block return in quick on $c_lan proto { udp tcp} to ! $c_lan port { 53 853 }

# Then allow any computer or device attached on the childrens LAN to reach
# the IP address x.x.x.x only.
pass in on $c_lan to x.x.x.x
If the website has multiple IP addresses you need to figure out what those are. Sometimes a domain name lookup can reveal all the relevant IP addresses at once, such as $ dig example.com ANY or drill example.com ANY. At other times you need to repeat the lookup multiple times at different intervals in the day in order to get the full range of IP addresses. You can also do that by setting up an automated script.
Sometimes you may need to contact the relevant company and ask if you can get the IP range for your pass list (some companies keep the information public, others refuse to release the information out of fear for malicious usage). Once you have determined what the IP range is you can put those into a PF table and then use that.
In this example we add a new table to the table section of the rules and then change the settings in the childrens rules.
#---------------------------------#
# Tables
#---------------------------------#

...

# Whitelist for the children.
table <passlist> { x.x.x.x y.y.y.y z.z.z.z }
And then in the childrens section change:
pass in on $c_lan to x.x.x.x
to:
pass in on $c_lan to <passlist>
It is not always possible to get all the needed IP addresses into a pass list all at once, but by monitoring the network, using e.g. tcpdump, when the game is trying to access a server, you can put together a working list, bit by bit. I have managed to do it with Mojang login servers and Minecraft servers and multiple other games.
Using a persistent table
Another approach to IP collecting for a pass list is to use a persistent table in combination with /etc/rc.local and domain name lookups. /etc/rc.local is only run after PF is started and as such problems with domain name resolving will not cause PF any problems.
Should you want to run with the persistent table solution you can do it by adding a persistent table to the table section in /etc/pf.conf:
table <passlist> persist
In the childrens section you still need to pass data in that goes to the pass list like in the above:
pass in on $c_lan to <passlist>
Then in /etc/rc.local you can add the following command:
pfctl -t passlist -T add example.com
Where example.com is the domain you want PF to lookup.
Whenever your kids cannot get access because the valid IP addresses might have changed, you can login to the firewall and then manually update the table with more IP addresses by running the command manually:
# pfctl -t passlist -T add examples.com
If you want to see what IP addresses have been added to the list you can do it with:
# pfctl -t passlist -T show
74.6.143.25
74.6.143.26
74.6.231.20
74.6.231.21
98.137.11.163
98.137.11.164
216.58.208.110
2001:4998:24:120d::1:0
2001:4998:24:120d::1:1
2001:4998:44:3507::8000
2001:4998:44:3507::8001
2001:4998:124:1507::f000
2001:4998:124:1507::f001
2a00:1450:400e:80e::200e
Eventually you can add all the IP addresses you collect (before they get flushed) into a physical file as the persist option can take input from a file as well:
table <passlist> persist file "/etc/pf-passlist.txt"
NOTE: The file will not get IP addresses added using the add option to pfctl. A persistent table either resides in memory or on a file, but the add option cannot write to disk, only to memory. A persistent table from a file is one you need to manually edit with a text editor.
Loading the rules
Once you have finished setting up your ruleset you can test your rules with:
# pfctl -nf /etc/pf.conf
If all is well, you load the ruleset by removing the -n option:
# pfctl -f /etc/pf.conf
Take a look at the translated result with:
# pfctl -s rules
Don't try to block DHCP
Just as a note, you cannot block access to dhcpd (port 67) via PF because on OpenBSD both dhcpd and dhclient use bpf by default for receiving and sending packets. This means that the packets are send and received before any filtering is done by PF.
Since bpf provides a raw interface to data link layers in a protocol-independent fashion, all packets on the network, even those destined for other hosts, are accessible through bpf.
See the post allow dhcpd with pf on the OpenBSD mailing list for relevant comments about this behavior.
Logging and monitoring
This is an example output from the PF log of blocked attempts to access the external NIC on a setup of mine. I have cleaned out the output a bit and removed some specific data, and 0.0.0.0 is of course not my public IP address, but you already knew that right ;)
# tcpdump -n -e -ttt -r /var/log/pflog
23:11:12 rule 14/(match) block in on em0: 45.129.33.4.45980 > 0.0.0.0.3422: S 1501043655:1501043655(0) win 1024
23:11:12 rule 14/(match) block in on em0: 45.129.33.4.45980 > 0.0.0.0.3481: S 311078394:311078394(0) win 1024
23:11:31 rule 14/(match) block in on em0: 176.214.44.229.25197 > 0.0.0.0.23: S 2084440900:2084440900(0) win 33620
23:11:33 rule 14/(match) block in on em0: 45.129.33.4.45980 > 0.0.0.0.3431: S 2774981044:2774981044(0) win 1024
23:11:43 rule 14/(match) block in on em0: 81.68.114.52.17191 > 0.0.0.0.23: S 1346864438:1346864438(0) win 26375
23:12:08 rule 14/(match) block in on em0: 193.27.229.26.53865 > 0.0.0.0.443: S 1057596009:1057596009(0) win 1024
23:12:31 rule 14/(match) block in on em0: 45.129.33.4.45980 > 0.0.0.0.4186: S 1233742605:1233742605(0) win 1024
23:12:44 rule 14/(match) block in on em0: 74.120.14.70.65509 > 0.0.0.0.9125: S 1836577847:1836577847(0) win 1024 <mss 1460> [tos 0x20]
23:12:44 rule 14/(match) block in on em0: 45.129.33.4.45980 > 0.0.0.0.4128: S 2112968453:2112968453(0) win 1024
23:13:15 rule 14/(match) block in on em0: 45.129.33.4.45980 > 0.0.0.0.3669: S 3627248539:3627248539(0) win 1024
23:13:19 rule 14/(match) block in on em0: 45.129.33.4.45980 > 0.0.0.0.3654: S 3889665614:3889665614(0) win 1024
23:13:29 rule 14/(match) block in on em0: 45.129.33.129.42239 > 0.0.0.0.4997: S 2249816896:2249816896(0) win 1024
23:13:37 rule 14/(match) block in on em0: 45.129.33.4.45980 > 0.0.0.0.3612: S 3797528151:3797528151(0) win 1024
23:14:03 rule 14/(match) block in on em0: 190.207.89.17.64372 > 0.0.0.0.445: S 1097568353:1097568353(0) win 8192 <mss 1460,nop,wscale 2,nop,nop,sackOK> (DF)
23:14:15 rule 14/(match) block in on em0: 45.129.33.4.45980 > 0.0.0.0.4219: S 2834775769:2834775769(0) win 1024
23:14:39 rule 14/(match) block in on em0: 45.129.33.4.45980 > 0.0.0.0.3702: S 1855726637:1855726637(0) win 1024
23:14:39 rule 14/(match) block in on em0: 45.129.33.4.45980 > 0.0.0.0.4210: S 3052103070:3052103070(0) win 1024
As you can see it's quite busy, and I have nothing running that is facing the Internet on that setup.
You can also monitor PF in real time with:
# tcpdump -n -e -ttt -i pflog0
DNS
Domain Name Service (DNS) is used to translate a domain name into an IP address or vise versa. For example, when you type wikipedia.org in your web browsers address field, an authoritative DNS server translates the domain name "wikipedia.org" to an IPv4 address such as 91.198.174.192 and/or IPv6 address such as 2620:0:862:ed1a::1.
DNS is also used, among many other things, to store information about which mail servers a specific domain name belongs to, if any.
If you're running a UNIX-like operating system, you can start up a terminal and try to perform a manual domain name lookup with host:
$ host wikipedia.org
wikipedia.org has address 91.198.174.192
wikipedia.org has IPv6 address 2620:0:862:ed1a::1
wikipedia.org mail is handled by 10 mx1001.wikimedia.org.
wikipedia.org mail is handled by 50 mx2001.wikimedia.org.
NOTE: If you don't have host installed, depending on what platform you're on, you might need to install bind or dnsutils. You can also use something like dig, also from bind, or drill from ldns
The following list describes some of the terms associated with DNS:
Forward DNSMapping of hostnames and domain names to IP addresses.
Reverse DNSMapping of IP addresses to hostnames and domain names.
ResolverA system through which a machine queries a name server for zone information, i.e. another name for a "DNS server".
Root zoneThe beginning of the Internet zone hierarchy. All zones fall under the root zone, similar to how all files in a file system fall under the root directory.
This is an example of zones:
.(a period) is how the root zone is usually referred to in documentation.org.is a Top-Level Domain (TLD) under the root zone.wikipedia.org.is a zone under theorg.TLD.1.168.192.in-addr.arpais a zone referencing all IP addresses which fall under the192.168.1.*IP address space.
When a computer on the Internet needs to resolve a domain name the resolver breaks the name up into its labels from right to left. The first component, the Top-Level Domain (TLD), is queried using a root server to obtain the responsible authoritative server. Queries for each label return more specific name servers until a name server returns the answer of the original query.
Even though any local DNS server can implement its own private root name servers, the term "root name server" is used to describe the thirteen well-known root name servers that implement the root name space domain for the Internet's official global implementation of the Domain Name System. Resolvers use a small 3 KB root.hints file, published by Internic, to bootstrap this initial list of root server addresses. For many pieces of software, including Unbound, this list is built into the software.
On the The Root Zone Database you can lookup the delegation details of top-level domains, including TLDs such as .com, .org, and country-code TLDs such as .uk and .de.
NOTE: Since you can lookup delegation details of top-level domains, you might expect that it would be possible to go deeper and actually look up every domain that a particular domain server has registered in its database. Since we, for example, can get a list of the responsible top-level domain servers for the .dk TLD, we might expect that it is possible to query one of those listed name servers for its entire database of authoritative servers, and then query one of those for all registered domains in its database. But that's not how DNS works. There are only two ways that a DNS servers complete database map can be obtained. Either you have to have access to the relevant zone files, or you need to physically construct a database by examining DNS traffic through a recursive DNS server and then reconstruct zone data based upon the data that is collected, until you get everything, which is highly unlikely that you ever will.
There are two DNS server configuration types:
AuthoritativeAuthoritative name servers publish IP addresses for domains under their authoritative control. These servers are listed as being at the top of the authority chain for their respective domains, and are capable of providing a definitive answer.
Authoritative name servers can be primary name servers, also known as master servers, i.e. they contain the original set of data, or they can be secondary or slave name servers, containing data copies usually obtained from synchronization directly with the primary server.
An authoritative name server is a name server that only gives answers to DNS queries from data that has been configured by an original source, for example, the domain administrator.
Every DNS zone must be assigned a set of authoritative name servers. This set of servers is stored in the parent domain zone with name server (NS) records. An authoritative server indicates its status of supplying definitive answers, deemed authoritative, by setting a protocol flag, called the "Authoritative Answer" (AA) bit in its responses.
You can use a network tool such as dig or drill to lookup a domain name, the tool will reply with an authoritative flag that reveals whether the DNS server you have queried is the authoritative one.
RecursiveRecursive servers, sometimes called "DNS caches" or "caching-only name servers", provide DNS name resolution for applications, by relaying the requests of the client application to the chain of authoritative name servers to fully resolve a network name. They also (typically) cache the result to answer potential future queries within a certain expiration time period.
Most Internet users access a public recursive DNS server provided by their ISP or a public DNS service provider.
In theory, authoritative name servers are sufficient for the operation of the Internet. However, with only authoritative name servers operating, every DNS query must start with recursive queries at the root zone of the Domain Name System and each user system would have to implement resolver software capable of recursive operation. To improve efficiency, reduce DNS traffic across the Internet, and increase performance in end-user applications, the Domain Name System supports recursive resolvers.
A recursive DNS query is one for which the DNS server answers the query completely by querying other name servers as needed.
A nameserver can be both authoritative and recursive at the same time, but it is recommended not to combine the configuration types. To be able to perform their work, authoritative servers should be available to all clients all the time. On the other hand, since the recursive lookup takes far more time than authoritative responses, recursive servers should be available to a restricted number of clients only, otherwise they are prone to distributed denial of service (DDoS) attacks.
NOTE: If needed, I recommend that you read "How DNS Works" in chapter 6 of the Linux Network Administrators Guide. I also recommend that you read Domain Name Service (DNS) on Wikipedia.
I present to you, Unbound
Unbound is a recursive, caching and validating Open Source DNS resolver with the following features:
- Cache with optional prefetching of popular items before they expire.
- DNS over TLS (DoT) forwarding and server, with domain-validation.
- DNS over HTTPS (DoH).
- Query Name Minimization.
- Aggressive Use of DNSSEC-Validated Cache.
- Authority zones, for a local copy of the root zone.
- DNS64.
- DNSCrypt.
- DNSSEC validating.
- EDNS Client Subnet.
Unbound is designed to be fast and secure and it incorporates modern features based on open standards. Late 2019, Unbound was rigorously audited.
TIP: One of the main reasons to use Unbound over several other simple caching-only resolvers, such as dnsmasq for example, is that if you do not use the forward option in Unbounds configuration, Unbound will query the root servers directly using their registered IP addresses listed in the Root Hints File. This will free you of your ISP DNS servers and any public DNS servers, such as Google or Cloudflare, and whatever data recording, selling and manipulation they're doing is avoided. A simple caching server such as dnsmasq will always forward queries to another server, whereas Unbound queries the root servers directly and works its way down the domain chain until it gets the relevant record from the registered authoritative DNS server for the relevant domain. This means that the DNS server that specifically knows what you're looking for is also the one that is authoritative to answer the question.
WARNING: If your ISP is hijacking DNS traffic, Unbound will not help you in any way. See the section DNS hijacking for information on how you can determine if you DNS traffic is getting hijacked.
In our setup with Unbound, a query for a domain such as "wikipedia.org" will look like this:
- Your browser sends a query to the operating system with the question, "What is the IP address of wikipedia.org"?
- The operating system, more specifically the resolver routines in the C library, which provide access to the Internet Domain Name System, will then forward the DNS request to the domain name server(s) listed in /etc/resolv.conf (on UNIX-like operating systems).
- Unbound receives the query and first looks for "wikipedia.org" in its cache and if not found, Unbound queries one of the root servers listed in its Root Hints File for the top-level domain ".org".
- The root server replies with a referral to the relevant servers for the ".org" top-level domain.
- Unbound then sends a query to one of the relevant servers asking for the authoritative DNS servers for "wikipedia.org".
- The server replies with a referral to the authoritative name servers registered for "wikipedia.org".
- Unbound then sends a query to one of those authoritative name servers and asks for the IP address for "wikipedia.org".
- The authoritative name server replies by sending the IP address it has listed in its "A" (IPv4) and/or "AAAA" (IPv6) record for the domain "wikipedia.org".
- Unbound receives the IP address from the authoritative name server and returns the answer to the client.
- If enabled, Unbound then caches the information for a pre-determined length of time for future queries for the same domain.
You can try to do a DNS trace yourself to see the above. I'm using drill in this example with the trace option enabled.
# drill -T wikipedia.org
.       518400  IN      NS      l.root-servers.net.
.       518400  IN      NS      k.root-servers.net.
.       518400  IN      NS      e.root-servers.net.
.       518400  IN      NS      a.root-servers.net.
.       518400  IN      NS      m.root-servers.net.
.       518400  IN      NS      h.root-servers.net.
.       518400  IN      NS      i.root-servers.net.
.       518400  IN      NS      f.root-servers.net.
.       518400  IN      NS      c.root-servers.net.
.       518400  IN      NS      b.root-servers.net.
.       518400  IN      NS      g.root-servers.net.
.       518400  IN      NS      d.root-servers.net.
.       518400  IN      NS      j.root-servers.net.
org.    172800  IN      NS      a0.org.afilias-nst.info.
org.    172800  IN      NS      a2.org.afilias-nst.info.
org.    172800  IN      NS      b0.org.afilias-nst.org.
org.    172800  IN      NS      b2.org.afilias-nst.org.
org.    172800  IN      NS      c0.org.afilias-nst.info.
org.    172800  IN      NS      d0.org.afilias-nst.org.
wikipedia.org.  86400   IN      NS      ns0.wikimedia.org.
wikipedia.org.  86400   IN      NS      ns1.wikimedia.org.
wikipedia.org.  86400   IN      NS      ns2.wikimedia.org.
wikipedia.org.  600     IN      A       91.198.174.192
NOTE: Unbound has the ability to validate the responses it receives as correct. This is usually accomplished using Domain Name System Security Extensions (DNSSEC) or by using 0x20-encoded random bits in the query to foil spoof attempts. With the exception of 0x20-encoded random bits, all the other validation settings such as harden-glue and hardened dnssec-stripped data are all enabled by default in Unbound on OpenBSD.
Blocking with DNS
DNS blocking, also called filtering, or DNS spoofing, is the process in which you supply the client that does the query with a "fake" reply. We block a request for a valid IP address either by replying with a NXDOMAIN, meaning non-existent domain, or with a redirect to another IP address than the intended by the owner of the domain.
This enables us to create a list, or multiple lists, of domains we want to block and rather than providing the user with the correct IP address for a certain domain, we return the message that the domain is "non-existent", which will block the application for further communication to the intended destination.
Normally all DNS requests are send to port 53 using either the UDP or TCP protocol, and by setting up a DNS server, which is what we do with Unbound, and by making sure that all traffic to port 53 reaches our DNS server or otherwise gets blocked, we can make sure that all DNS replies originates from our internal Unbound server that is running on our OpenBSD router.
NOTE: You cannot fully trust DNS blocking because DNS blocking can be circumvented. Even though we have a solid approach in place it is always possible for someone to use a VPN service to circumvent this setup. We're not trying to build a 100% foolproof system - even though we will be looking a bit further into that a little later in the guide - we're just trying to protect our families in better ways. There are also always other access points to the Internet we need to consider, such as phones, friends phones and houses, public Internet access, etc.
NXDOMAIN vs redirecting
When we want to block a domain using DNS we can choose between several methods, but the two most popular is to either redirect the DNS query to a local IP address, such as 127.0.0.1 or 0.0.0.0, or to reply with a Non-existent Internet Domain Names Definition (NXDOMAIN). The NXDOMAIN is a standard reply for a "non-existent Internet or Intranet domain name". If the domain name is unable to be resolved using DNS, a condition called NXDOMAIN occurred.
We can try to resolve a non-existing domain with the host command:
$ host a1b7c3n9m3b0.com
Host a1b7c3n9m3b0.com not found: 3(NXDOMAIN)
Since the domain name "a1b7c3n9m3b0.com" isn't registered by anyone (at least not while I write this), we get a "NXDOMAIN" response.
We can also use drill. The relevant information from the output of drill is the rcode field in the "HEADER" section:
$ drill a1b7c3n9m3b0.com
;; ->>HEADER<<- opcode: QUERY, rcode: NXDOMAIN, id: 39710
…
Or if you prefer dig, then the relevant information is located in the status field in the "HEADER" section:
$ dig a1b7c3n9m3b0.com
; <<>> DiG 9.16.8 <<>> +search a1b7c3n9m3b0.com
;; global options: +cmd
;; Got answer:
;; ->>HEADER<<- opcode: QUERY, status: NXDOMAIN, id: 48858
…
Using the NXDOMAIN reply is not only the correct way to block a domain, according to RFC 8020, but it is also the best way since a redirect to an IP address like 127.0.0.1 or 0.0.0.0 will simply make the client that initiated the DNS query talk to itself.
It may be that the browser will reply with something like: Firefox can't establish a connection to the server at 0.0.0.0.. However, because the IP address 0.0.0.0 simply translates to our local machine, we're still able to ping that address as it is synonymous to pinging 127.0.0.1:
$ ping 0.0.0.0
PING 0.0.0.0 (127.0.0.1) 56(84) bytes of data.
64 bytes from 127.0.0.1: icmp_seq=1 ttl=64 time=0.019 ms
64 bytes from 127.0.0.1: icmp_seq=2 ttl=64 time=0.049 ms
As such I recommend that you always use the NXDOMAIN reply, which is what we're going to use in this tutorial.
TIP: Unbound can handle huge lists of blocked domains with a NXDOMAIN reply, but it cannot handle large lists of domains that needs to be redirected very well. If for some reason you should insist on redirecting instead of using NXDOMAIN, I recommend you setup dnsmasq with the --addn-hosts=<file> option, then make dnsmasq listen on port 53 and have dnsmasq redirect all blocked domains, while it then forwards normal DNS queries to Unbound. Then have Unbound setup to listen on a non-standard port, such as port 5353. Contrary to Unbound, dnsmasq can handle huge lists of redirects very well, but it cannot handle large lists of NXDOMAIN domains very well, it becomes extremely slow.
The problem with DNS over HTTPS (DoH)
With the introduction of DNS over HTTPS (DoH), DNS blocking has become much more difficult, and while I certainly respect the original idea behind the promotion of DoH from a privacy point of view, DoH is a bad construction from a security point of view, and it is the WRONG approach.
With the already growing number of public DNS servers capable of serving DNS over HTTPS, any application can now utilize DoH and completely circumvent private and enterprise level DNS blocking. Not only that, but DoH has opened the door wide up for application developers to setup their own DoH servers and have their applications use those instead of the regular DNS server attached to the internal network. This is especially problematic regarding proprietary sofware in which you not only cannot see the source code, but you can also not change any DoH settings.
Because of DoH we cannot simply block domains, like ad and porn, we must also begin blocking public DoH servers via the firewall too. However, while keeping a list of a growing number of IP addresses of public DoH servers is problematic enough, keeping a list of unknown public DoH servers, which might get utilized by proprietary software, like firmware in IoT devices, is impossible.
DoH has also been a complete nightmare for enterprises because it basically makes it possible to overwrite centrally-imposed DNS settings. This makes it impossible to provide filtering solutions with ad and porn blocking (such as the one we're making in this guide), and it also makes it impossible for system administrators to monitor DNS settings across operating systems to prevent DNS hijacking attacks. Having multiple applications with their own unique DoH settings is a nightmare.
DoH also completely messes up network analysis and monitoring of DNS traffic for security purposes. In 2019, Godlua, a Linux DDoS bot, was the first malware application seen using DoH to hide its DNS traffic.
Furthermore, and perhaps most important, DoH does not prevent tracking of users. Some parts of the HTTPS connection are not encrypted, such as SNI fields (it's slowly getting there though), OCSP connections, and of course the destination IP addresses, which in my humble opinion is the most crucial part of the communication that needs to be hidden!
People who truly need privacy, like journalists in countries with a privacy compromising policy, cannot trust DoH! The IP address of the destination server cannot be hidden with DoH, even if everything about the traffic itself is encrypted. If someone truly needs to encrypt communication the person needs a completely different strategy than DoH.
This makes me wonder who in the world thought that DoH was a good idea to begin with!? Did they not understand the basics behind communication with HTTPS, or has this agenda perhaps been pushed forward by a few private DNS service companies, such as Google and Cloudflare, who gain profit by further collecting user data?
Some public DNS service providers state that from a privacy perspective DoH is better than the alternatives, such as DNS over TLS (DoT), as DNS queries are hidden within the larger flow of HTTPS traffic. This gives network administrators less visibility, but provides users with more privacy.
That message is problematic. While it is true that the initial domain name lookup is hidden in the HTTPS traffic, the destination IP address provided by the DoH server isn't. When the client application visits the destination IP address, both the source IP address and the destination IP addresses are logged at the ISP level (and possibly multiple other levels as well).
While it isn't immediately possible to determine exactly what domain name the user is trying to reach on the destination web server, especially if the web server is running multiple domains under the same IP address, it is definitely neither impossible nor even difficult.
NOTE: In the appendix you can find a section called Inspecting DNS over HTTPS (DoH), in which we will look at a demonstration on how the destination IP address is revealed in the DoH communication. You can also find a section called Blocking DNS over HTTPS (DoH) in which we use the PF firewall to block known public DoH servers.
Setting up Unbound
Basic settings
Setting up Unbound is very easy as Unbound not only comes with great defaults, but it is also very well documented. Before we begin I advice that you take a look at the OpenBSD man page for unbound, unbound-checkconf and unbound.conf.
Because Unbound is chrooted on OpenBSD, the configuration file unbound.conf doesn't reside in /etc, as it otherwise normally would, instead it resides in /var/unbound/etc/.
Copy the existing Unbound configuration file:
# mv /var/unbound/etc/unbound.conf /var/unbound/etc/unbound.conf.backup
Then use your favorite text editor and create a new /var/unbound/etc/unbound.conf file and populate it with the following contents:
server:

    # Logging (default is no).
    # Uncomment this section if you want to enable logging.
    # Note enabling logging makes the server (significantly) slower.
    # verbosity: 2
    # log-queries: yes
    # log-replies: yes
    # log-tag-queryreply: yes
    # log-local-actions: yes

    interface: 127.0.0.1
    interface: 192.168.1.1
    interface: 192.168.2.1
    interface: 192.168.3.1

    # In case you need Unbound to listen on an alternative port, this is the
    # syntax:
    # interface: 127.0.0.1@5353

    # Control who has access.
    access-control: 0.0.0.0/0 refuse
    access-control: ::0/0 refuse
    access-control: 127.0.0.0/8 allow
    access-control: ::1 allow
    access-control: 192.168.1.0/24 allow
    access-control: 192.168.2.0/24 allow
    access-control: 192.168.3.0/24 allow

    # "id.server" and "hostname.bind" queries are refused.
    hide-identity: yes

    # "version.server" and "version.bind" queries are refused.
    hide-version: yes

    # Cache elements are prefetched before they expire to keep the cache up to date.
    prefetch: yes

    # Our LAN segments.
    private-address: 192.168.0.0/16

    # We want DNSSEC validation.
    auto-trust-anchor-file: "/var/unbound/db/root.key"

# Enable the usage of the unbound-control command.
remote-control:
    control-enable: yes
    control-interface: /var/run/unbound.sock
I have commented the options above, but if you need further explanation for the configuration take a look at each setting in the man page for unbound.conf.
Logging is done to syslog by default. If you want to change that you can create a log file in Unbounds chroot and then have Unbound log to that:
# mkdir /var/unbound/log
# touch /var/unbound/log/unbound.log
# chown -R root._unbound /var/unbound/log
# chmod -R 774 /var/unbound/log
Then in the unbound.conf file, add the following options to the logging section:
logfile: "/log/unbound.log"
use-syslog: no
log-time-ascii: yes
NOTE: We do not use the full path to the log file because Unbound is chrooted. With the logfile option above the log file ends up in /var/unbound/log/unbound.log.
Then restart Unbound:
# rcctl restart unbound
In the settings above I have allowed Unbound to listen on the loopback interface (127.0.0.1) in order for local network applications to be able to do lookups if needed. In /etc/resolv.conf on our OpenBSD router I have listed our Unbound DNS server as I don't want anything on the router to query ISP DNS servers:
nameserver 127.0.0.1
If you are using DHCP the get an IP address on the external NIC (the interface connected to your ISP modem or router) you need to make sure that dhcpleased doesn't change /etc/resolv.conf. Edit /etc/dhcpleased.conf and add:
interface em0 { ignore dns }
This will make sure that we only have our local DNS server listed.
Enable Unbound with:
# rcctl enable unbound
Whenever you change the Unbound configurations you can either just restart Unbound with:
# rcctl restart unbound
Or simply reload the configuration options afresh (this also flushes the cache):
# unbound-control reload
You can list the settings Unbound is started with by running the following command (this goes for any service running on OpenBSD):
# rcctl get unbound
If you want to get some statistical data, you can run:
# unbound-control stats_noreset
thread0.num.queries=2056
thread0.num.queries_ip_ratelimited=0
thread0.num.cachehits=678
thread0.num.cachemiss=1378
thread0.num.prefetch=15
thread0.num.expired=0
…
You can also get a dump of the cache:
# unbound-control dump_cache|less
If you want to see what name servers Unbound queries for a specific domain, you can do that with:
# unbound-control lookup wikipedia.org
If you want to flush the cache for a specific domain, you can do that with:
# unbound-control flush example.com
Take a look at the man page for unbound-control for further options and commands.
Override ridiculously low TTL settings
One thing that has become a great nuisance is people setting ridiculously low TTL values for their domains. For some reason it has almost become a trend to have a default value of 60 seconds.
The problem with a very low TTL is that it makes DNS caching completely useless. A query will only use the cached reply as long as the TTL hasn't expired. Even though the RFCs say that a TTL must be respected, with such low values DNS becomes extremely inefficient. I therefore recommend that you override the TTL setting by setting your own default at one hour. Another improvement in DNS request speed is to reduce latency by serving the outdated record before updating it instead of the other way around.
cache-min-ttl: 3600
serve-expired: yes
One theoretical problem with increasing the TTL is that a domain might get a new IP address which then cannot be resolved because you have an old entry in the cache. However, in practice the risk of running into an outdated domain is minimal and it is well worth the improved usage of the cache to set a default minimum TTL to an hour.
Let's block some domains!
Now we get to the interesting part about domain blocking.
I have created a simple shell script called DNSBlockBuster that automatically downloads a set of hosts files from various online sources, concatenates them into one, does some cleanup, and then converts the result into a domain block list for both Unbound and dnsmasq. It mainly blocks ads, porn sites and tracking.
With DNSBlockBuster you have the option to create a pass list, should any of the domains listed in the hosts files be a false positive for you, and you can add your own block list in case you want to manually block some domains that aren't listed in the hosts files. You can also easily add new block lists or remove any of the provided block lists.
You don't need to use my script of course, but I will use the script in this tutorial.
Currently the script creates a huge domain list with almost two million domains listed and Unbound takes up about 705MB of memory in total when the entire block list is loaded.
In order to prevent Unbound from timing out during the loading of such a big list, edit /etc/rc.conf.local and add the following:
unbound_timeout=240
Then restart Unbound:
# rcctl restart unbound
Take a look at the Usage section in the documentation for DNSBlockBuster on how to use it. It's easy and simple.
Once you have created your block list for Unbound place it in /var/unbound/etc/, then edit the Unbound configuration file /var/unbound/etc/unbound.conf and insert the following somewhere in the server section (before the remote-control section) of the configuration file:
include: "/var/unbound/etc/unbound-blocked-hosts.conf"

# Enable the usage of the unbound-control command.
remote-control:
    control-enable: yes
    control-interface: /var/run/unbound.sock
Now reload Unbound with:
# unbound-control reload
If you run the top command in another terminal you will notice that Unbound takes up quite a bit of CPU while it is initially loading the list. Also notice the memory usage.
You can now test our DNS blocking by querying one of the blocked domains from the list:
$ drill 3lift.com
;; ->>HEADER<<- opcode: QUERY, rcode: NXDOMAIN, id: 55906
…
Then try the same with Cloudflares DNS server:
$ drill 3lift.com @1.1.1.1
;; ->>HEADER<<- opcode: QUERY, rcode: NOERROR, id: 48771
…
As we can see from the queries, our DNS server blocks access to the domain 3lift.com by replying with a NXDOMAIN, while Cloudflares DNS server replies with the correct IP address.
DNS security
DNS security is a broad subject. In this section we'll deal with a few of the topics that mostly concern us with regard to running our own DNS server.
The DNS protocol is unencrypted and does not, by default, account for any confidentiality, integrity or authentication. If you use an untrusted network or a malicious ISP, your DNS queries can be eavesdropped and the responses manipulated. Furthermore, ISPs can conduct DNS hijacking.
DNS hijacking
DNS hijacking means that the DNS queries you perform gets redirecting to another DNS server. This is typically done by redirecting all traffic on port 53 from one destination to another.
One of the simplest ways to determine whether your ISP is hijacking your DNS traffic is to query an authoritative DNS server directly.
We can use multiple tools for this. In this example we'll first use drill. The options, in this example, are the same for dig. We'll use the domain "wikipedia.org" again.
First we need to get the authoritative servers. They will appear in the "ANSWER SECTION":
$ drill NS wikipedia.org
;; ->>HEADER<<- opcode: QUERY, rcode: NOERROR, id: 28789
;; flags: qr rd ra ; QUERY: 1, ANSWER: 3, AUTHORITY: 0, ADDITIONAL: 0
;; QUESTION SECTION:
;; wikipedia.org.       IN      NS

;; ANSWER SECTION:
wikipedia.org.  85948   IN      NS      ns2.wikimedia.org.
wikipedia.org.  85948   IN      NS      ns0.wikimedia.org.
wikipedia.org.  85948   IN      NS      ns1.wikimedia.org.

;; AUTHORITY SECTION:

;; ADDITIONAL SECTION:

;; Query time: 1 msec
;; SERVER: 127.0.0.1
;; WHEN: Thu Nov  5 07:53:19 2020
;; MSG SIZE  rcvd: 95
Then we need to query one of those authoritative servers directly. The important field to pay attention to is the flags in the "HEADER" field. In order for the answer to be authoritative the flag aa must be listed.
$ drill @ns1.wikimedia.org wikipedia.org
;; ->>HEADER<<- opcode: QUERY, rcode: NOERROR, id: 57611
;; flags: qr aa rd ; QUERY: 1, ANSWER: 1, AUTHORITY: 0, ADDITIONAL: 0
;; QUESTION SECTION:
;; wikipedia.org.       IN      A

;; ANSWER SECTION:
wikipedia.org.  600     IN      A       91.198.174.192

;; AUTHORITY SECTION:

;; ADDITIONAL SECTION:

;; Query time: 127 msec
;; SERVER: 208.80.153.231
;; WHEN: Thu Nov  5 07:56:10 2020
;; MSG SIZE  rcvd: 47
This shows that the reply we got was not hijacked as the reply was authoritative. Let's try to give the Cloudflare public DNS server the same query:
$ drill @1.1.1.1 wikipedia.org
;; ->>HEADER<<- opcode: QUERY, rcode: NOERROR, id: 40562
;; flags: qr rd ra ; QUERY: 1, ANSWER: 1, AUTHORITY: 0, ADDITIONAL: 0
;; QUESTION SECTION:
;; wikipedia.org.       IN      A

;; ANSWER SECTION:
wikipedia.org.  555     IN      A       91.198.174.192

;; AUTHORITY SECTION:

;; ADDITIONAL SECTION:

;; Query time: 3 msec
;; SERVER: 1.1.1.1
;; WHEN: Thu Nov  5 08:02:58 2020
;; MSG SIZE  rcvd: 47
Notice how the aa flag is missing from the "HEADER" field. This means that the reply was not authoritative.
Another more simple tool is nslookup. Let's first query for the authoritative name servers:
nslookup -querytype=NS wikipedia.org
Server:         127.0.0.1
Address:        127.0.0.1#53

Non-authoritative answer:
wikipedia.org   nameserver = ns1.wikimedia.org.
wikipedia.org   nameserver = ns2.wikimedia.org.
wikipedia.org   nameserver = ns0.wikimedia.org.
Then let's try to query our own DNS server for the domain:
$ nslookup wikipedia.org
Server:         127.0.0.1
Address:        127.0.0.1#53

Non-authoritative answer:
Name:   wikipedia.org
Address: 91.198.174.192

Server:         ns2.wikimedia.org
Address:        91.198.174.239#53

Name:   wikipedia.org
Address: 91.198.174.192
The message Non-authoritative clearly demonstrates that the reply isn't from an authoritative DNS server. That's fine, we did query our own DNS server. Let's try to query one of the authoritative servers directly:
$ nslookup wikipedia.org ns0.wikimedia.org
Server:         ns0.wikimedia.org
Address:        208.80.154.238#53

Name:   wikipedia.org
Address: 91.198.174.192
The message Non-authoritative is gone, the reply we got was authoritative, which means that our DNS query was not hijacked.
I have now enabled a VPN service that I know intercepts DNS queries in order to protect customers against DNS leakage and I am now going to query one of the authoritative servers again:
$ nslookup wikipedia.org ns0.wikimedia.org
Server:         ns0.wikimedia.org
Address:        208.80.154.238#53

Non-authoritative answer:
Name:   wikipedia.org
Address: 91.198.174.192
Name:   wikipedia.org
Address: 2620:0:862:ed1a::1
As expected the answer was not authoritative even though I queried the authoritative server directly. The DNS traffic was hijacked and the reply was redirected to another unknown DNS server.
DNS hijacking, whether performed by the ISP or someone else, is highly problematic. First of all, we cannot fully trust the answer we get from the DNS server. Secondly, even if the DNS reply does deliver untampered data, the DNS traffic has been hijacked for some unknown reason, which might be data collection and logging, or completely different.
NOTE: Some ISPs such as Optimum Online, Comcast, Time Warner, Cox Communications, RCN, Rogers, Charter Communications, Verizon, Virgin Media, Frontier Communications, Bell Sympatico, Airtel, OpenDNS and others started the practice of DNS hijacking on non-existent domain names (NXDOMAIN) for making money by displaying advertisements. The DNS server redirected a request to a non-existing domain name to a fake IP address that contained a website with ads. I don't know how many ISPs and public DNS service providers that still do that.
DNS hijacking prevention
If you have discovered that your DNS traffic on port 53 gets hijacked you basically got three options in order to protect yourself:
- If you have the option then change your ISP! Your ISP should not be hijacking your DNS traffic. Period.
- Setup your own remote DNS server on a hosting center that doesn't hijack or block port 53. Then have your remote DNS server listen for DNS connections on a non-standard port and forward all your DNS queries to your remote DNS server.
- Use a trusted VPN that doesn't hijack DNS traffic, or if it does, make sure you can trust their non-logging policy.
DNS spoofing
DNS spoofing, also referred to as DNS cache poisoning, is something different from DNS hijacking. While the traffic gets redirected from one destination to another in a DNS hijacking attack, it is the data itself that gets manipulated in a DNS spoofing attack. Often the two attack strategies are combined.
In a DNS spoofing attack, manipulated data is introduced into the DNS resolver's cache, causing the name server to return an incorrect result, e.g. a wrong IP address.
DNS spoofing prevention
This kind of attack can be mitigated at the transport layer or application layer by performing end-to-end validation once a connection is established. A common example of this is the use of Transport Layer Security (TLS) and digital signatures.
Secure DNS (DNSSEC) uses cryptographic digital signatures signed with a trusted public key certificate to determine the authenticity of data. DNSSEC can protect against DNS spoofing, however many DNS administrators have still not implemented it.
As of 2020, all of the original TLDs support DNSSEC, as do country code TLDs of most large countries, but many country code TLDs still do not.
Appendix
Inspecting DNS over HTTPS (DoH)
I want to illustrate the fact that DoH doesn't really provide any true privacy as both the source IP address and the destination IP address can be seen clearly in the HTTPS communication.
First I have made sure that DoH is disabled in Firefox, on one of the computers on the grown-ups LAN, and I am monitoring traffic on the em1 NIC with the usage of tcpdump. I have also enabled the log file on Unbound, just to avoid filling up syslog with too much DNS noise, and I am using tail to monitor the log.
I'll head over to "wikipedia.org" in the browser and then see what the surveillance on the router reveals.
# tcpdump -n -i em1 src host 192.168.1.5 and not arp
tcpdump: listening on em1, link-type EN10MB
23:30:33.494352 192.168.1.5.55724 > 192.168.1.1.53: 58136+ A? wikipedia.org.(31) (DF)
23:30:33.774439 192.168.1.5.58372 > 192.168.1.1.53: 58448+ A? www.wikipedia.org.(35) (DF)
23:30:34.184287 192.168.1.5.46639 > 192.168.1.1.53: 15167+ A? www.wikipedia.org.(35) (DF)
…
# tail -f /var/unbound/log/unbound.log
Nov 05 23:30:33 unbound[12636:0] query: 192.168.1.5 wikipedia.org. A IN
Nov 05 23:30:33 unbound[12636:0] reply: 192.168.1.5 wikipedia.org. A IN NOERROR 0.097209 0 47
Nov 05 23:30:33 unbound[12636:0] query: 192.168.1.5 www.wikipedia.org. A IN
Nov 05 23:30:33 unbound[12636:0] reply: 192.168.1.5 www.wikipedia.org. A IN NOERROR 0.154989 0 80
Nov 05 23:30:34 unbound[12636:0] query: 192.168.1.5 www.wikipedia.org. A IN
Nov 05 23:30:34 unbound[12636:0] reply: 192.168.1.5 www.wikipedia.org. A IN NOERROR 0.000000 1 80
…
Naturally we're seeing the query both on the interface traffic as well as in the Unbound log.
I have then enabled DoH and disabled regular DNS in Firefox, by setting the value of network.trr.mode to 4. I have then changed the Network settings and set Cloudflare as the DoH provider.
TIP: If you just enable DoH in Firefox via the preferences pane, Firefox will still use regular DNS as a fallback. In order to force Firefox to only use DoH you can set the value of network.trr.mode.
Type about:config in the URL bar and press Enter to access Firefox's hidden configuration panel.
Step 2: Look for the setting network.trr.mode. This controls DoH support. This setting supports four values:
1 - DoH is disabled.
2 - DoH is enabled, but Firefox uses both DoH and regular DNS based on which returns faster query responses
3 - DoH is enabled, and regular DNS works as a backup
4 - DoH is enabled, and regular DNS is disabled
5 - DoH is disabled
Step 3: Look for the setting network.trr.bootstrapAddress. This controls the numerical IP address for your DoH server. Input the value of 1.1.1.1 into the field and press Enter.
This time I'll visit "freebsd.org".
# tcpdump -n -i em1 src 192.168.1.5 and not arp
tcpdump: listening on em1, link-type EN10MB
00:21:10.944243 192.168.1.5.32856 > 1.1.1.1.443: P 2223446146:2223446202(56) ack 157857007 win 501 (DF)
00:21:10.948719 192.168.1.5.46584 > 96.47.72.84.80: S 922508523:922508523(0) win 64240 <mss 1460,sackOK,timestamp 1673624773 0,nop,wscale 7> (DF)
00:21:11.133801 192.168.1.5.33298 > 96.47.72.84.443: S 3275123911:3275123911(0) win 64240 <mss 1460,sackOK,timestamp 1673624958 0,nop,wscale 7> (DF)
…
# tail -f /var/unbound/log/unbound.log
Nov 05 23:30:33 unbound[12636:0] query: 192.168.1.5 wikipedia.org. A IN
Nov 05 23:30:33 unbound[12636:0] reply: 192.168.1.5 wikipedia.org. A IN NOERROR 0.097209 0 47
Nov 05 23:30:33 unbound[12636:0] query: 192.168.1.5 www.wikipedia.org. A IN
Nov 05 23:30:33 unbound[12636:0] reply: 192.168.1.5 www.wikipedia.org. A IN NOERROR 0.154989 0 80
Nov 05 23:30:34 unbound[12636:0] query: 192.168.1.5 www.wikipedia.org. A IN
Nov 05 23:30:34 unbound[12636:0] reply: 192.168.1.5 www.wikipedia.org. A IN NOERROR 0.000000 1 80
…
This reveals, from the monitoring of the network interface, that a connection was made to Cloudflares DNS server on 1.1.1.1 on port 443 (HTTPS) and that we visited the IP destination address 96.47.72.84 right after. At the same time nothing has happened in the Unbound log, tail still just shows the previous query.
If we do a regular DNS query on the router we can verify that the IP address 96.47.72.84 is indeed the IP address for "freebsd.org".
Furthermore, in this specific example we can even get straight to the website of "freebsd.org" just by inputting the destination IP address 96.47.72.84 into the browsers address field.
This demonstrates that even though DoH bypasses the regular DNS query, it is not able to hide the destination IP address that is still present in clear text in the communications traffic.
Blocking DNS over HTTPS (DoH)
Previously the DNSBlockBuster script already had some DoH domain names in the list, that I had randomly thrown in, but I have since removed DoH blocking from the DNS server as it really needs happen on the firewall level only.
Blocking DoH via domain names doesn't make much sense in my humble opinion as a domain name has to be looked up in the first place. Most clients that use DoH has the host IP address for the DoH server encoded directly into the source code.
If you don't use IPv6 you can block all outgoing IPv6 traffic and then only use the IPv4 list. Change the pass out parameter, in the "Default protect and block" section of /etc/pf.conf, to pass out inet. That way you only allow outgoing IPv4 traffic and don't need to specifically block IPv6 DoH IP addresses.
Download the IP list from awesome-lists and edit the list to suit your needs and put it somewhere on disk.
I have made a subdirectory /etc/pf-block-lists where I place all IP block lists I need for PF.
Then create a persistent file for PF in the "Tables" section of /etc/pf.conf:
# Public DoH servers.
table <block_doh> persist file "/etc/pf-block-lists/doh-ipv4.txt"
If you need IPv6 then add that too:
table <block_doh> persist file "/etc/pf-block-lists/doh-ipv4.txt" file "/etc/pf-block-lists/doh-ipv6.txt"
And then add a block to the "Protect and block by default" section of the firewall:
# Let's block DoH.
block in quick on { $g_lan $c_lan $dmz } to <block_doh>
Reload with:
# pfctl -f /etc/pf.conf
Check the list with:
# pfctl -vvt block_doh -T show
If - after some time - you want to see what IP addresses that actually have been used in a blocking, you can filter the output:
# pfctl -vvt block_doh -T show | awk '/\[/ {p+=$4; b+=$6} END {print p, b}'
Adding the domain-name option to DHCP and using a FQDN
If we setup our network such that all computers and device have fixed IP addresses and hostnames, many tools will not work out-of-the-box with these hostnames without adding a domain name to the DNS server. This is because a networking tool like host expects the lookup to be a hostname on a fully qualified domain name (FQDN).
Let's say that I have a computer setup on my LAN with the hostname "foo" and the fixed IP address 192.168.1.7. I may not remember that "foo" is the computer with that address, or I may not remember which host has the IP address 192.168.1.7 associated with it.
With a FQDN we can do lookups like this:
$ host foo.example.com
foo.example.com has address 192.168.1.7
And we can do:
# host 192.168.1.7
7.1.168.192.in-addr.arpa domain name pointer foo.example.com
However, it is annoying to type the full domain each time. If we add the domain-name option to /etc/resolv.conf the domain name will be appended automatically. We can know just do this:
$ host foo
foo.example.com has address 192.168.1.7
Some people recommend that you register a domain name and then use that internally on your LAN, and while that certainly works, it is not necessary at all. According to the RFC 8375 you should use the .home.arpa domain as this is meant to be used inside a small network, such as a home network.
Let's start by making some changes to the /etc/dhcpd.conf configuration. Just to make it simple I'll only use the web server from the public LAN example, but you can expand this to any segment you like and you can also use this across segments if needed.
In our current setup we already have the domain example.com attached to the web server so we can just use that. But if you don't have a public facing server that needs a real domain name, just change it to home.arpa. I have changed the name of our web server to "lilo" (yes, from Lilo & Stitch, because it's way more cool that Luke or Yoda!).
subnet 192.168.1.0 netmask 255.255.255.0 {
    option domain-name-servers 192.168.1.1;
    option domain-name "example.com";
    option routers 192.168.1.1;
    range 192.168.1.10 192.168.1.254;
}
subnet 192.168.2.0 netmask 255.255.255.0 {
    option domain-name-servers 192.168.2.1;
    option domain-name "example.com";
    option routers 192.168.2.1;
    range 192.168.2.10 192.168.2.254;
}
subnet 192.168.3.0 netmask 255.255.255.0 {
    option domain-name-servers 192.168.3.1;
    option domain-name "example.com";
    option routers 192.168.3.1;
    range 192.168.3.10 192.168.3.254;
    host lilo.example.com {
        fixed-address 191.168.3.2;
        hardware ethernet 61:20:42:39:61:AF;
        option host-name "lilo";
    }
}
If you prefer to use multiple domains rather than just one, say like example.com for your professional web development, and then home.arpa for your private LAN, you can use a search domain with the domain-search option in /etc/dhcpd.conf instead of the domain-name option. The difference between the two is that with domain-name only a single domain is appended, but with the domain-search option, multiple domains can be added and they are then "searched" one by one until the host is found.
The domain-search option looks like this:
option domain-search "example.com", "home.arpa"
Then we need to setup Unbound to handle our fixed IP addresses. In this example we only have the web server, but you can use as many hosts as you need. You can just edit the main configuration file for Unbound, but I prefer to put this into a separate file and then include that from the main file. Create a new file called something like /var/unbound/etc/unbound-local.conf and setup your hosts:
local-data: "lilo.example.com IN A 192.168.3.2"
local-data-ptr: "192.168.3.2 lilo.example.com"
Or if you use the home.arpa version:
local-data: "lilo.home.arpa IN A 192.168.3.2"
local-data-ptr: "192.168.3.2 lilo.home.arpa"
Notice how the IP address in the local-data-ptr field is backwards, that is not by mistake.
Then add the following to our /var/unbound/etc/unbound.conf:
private-address: 192.168.0.0/16
private-domain: example.com # Use home.arpa instead if you need that.
include: "/var/unbound/etc/unbound-local.conf"
Restart dhcpd and Unbound:
# rcctl restart dhcpd
# rcctl restart unbound
If you pull out the Ethernet cable from one of the attached computers on one of the LANs and plug it back in, you'll notice that the /etc/resolv.conf has had the domain option added:
domain example.com
nameserver 192.168.1.1
You can expand on the above example to multiple domains and multiple hosts across all segments.
Adding pf-badhost
When you have setup your OpenBSD router I highly recommend you setup pf-badhost to your setup!
pf-badhost is a lightweight security script made by Jordan Geoghegan that blocks many of the internet's biggest irritants. Annoyances such as SSH and SMTP bruteforcers are largely eliminated by the script.
pf-badhost periodically pulls IP addresses from well-known spammer-IPs databases, such as Spamhaus, Firehol, Emerging Threats and Binary Defense, where bad IP addresses are frequently logged. pf-badhost then adds the collected IP addresses to the PF firewall as a table that is default blocked.
unbound-adblock
unbound-adblock is another script made by Jordan Geoghegan that allows you to block online advertisements networks. You can use unbound-adblock as an alternative to my DNSBlockBuster if you prefer that.
Recommended reading
- OpenBSD PF - User's Guide from the OpenBSD FAQ.
- Absolute OpenBSD, 2nd Edition by Michael Warren Lucas. Some of the PF syntax have changed since Michael wrote the book, but it is still very useful.
- Networking for System Administrators by Michael Warren Lucas.
- OpenBSD and You
- Stop using ridiculously low DNS TTLs
Relevant links
- Extensive list of public DNS resolvers supporting the DNSCrypt and DNS-over-HTTP2 protocols
- cURL's of publicly available DoH servers
- Another list of DoH servers
How to contribute to the guide?
Please consider contributing if you have any comments, corrections, or changes you consider appropriate.
- Clone on GitHub
- Submit a pull request for consideration
You can also just use email :)
Please note: I do not accept translations of the guide as it will not be possible for me to make sure that the translation is kept updated or even correct.